To trigger an event from Operating system(OS):
login to os with sidadm
sapevt event=<backgroup job event @ sm64> name=<sid> mshost=<hostname>
Showing posts with label to. Show all posts
Showing posts with label to. Show all posts
Sunday, 16 February 2025
Background job administration - To trigger an event from Operating system(OS)
Monday, 6 January 2025
How to extend btrfs filesystem in SUSE linux
to check free space available to extend for VGS:
sudo vgs system
SAPHANA:~ # df -Th
Filesystem Type Size Used Avail Use% Mounted on
devtmpfs devtmpfs 4.0M 0 4.0M 0% /dev
tmpfs tmpfs 6.2G 0 6.2G 0% /dev/shm
tmpfs tmpfs 1.3G 18M 1.3G 2% /run
tmpfs tmpfs 4.0M 0 4.0M 0% /sys/fs/cgroup
/dev/mapper/system-root btrfs 60G 3.9G 55G 7% /
/dev/mapper/system-root btrfs 60G 3.9G 55G 7% /.snapshots
/dev/mapper/system-root btrfs 60G 3.9G 55G 7% /boot/grub2/x86_64-efi
/dev/mapper/system-root btrfs 60G 3.9G 55G 7% /boot/grub2/i386-pc
/dev/mapper/system-root btrfs 60G 3.9G 55G 7% /srv
/dev/mapper/system-root btrfs 60G 3.9G 55G 7% /home
/dev/mapper/system-root btrfs 60G 3.9G 55G 7% /opt
/dev/mapper/system-root btrfs 60G 3.9G 55G 7% /tmp
/dev/mapper/system-root btrfs 60G 3.9G 55G 7% /var
/dev/mapper/system-root btrfs 60G 3.9G 55G 7% /root
/dev/mapper/system-root btrfs 60G 3.9G 55G 7% /usr/local
tmpfs tmpfs 637M 56K 637M 1% /run/user/466
tmpfs tmpfs 637M 56K 637M 1% /run/user/0
/dev/sr0 iso9660 12G 12G 0 100% /run/media/root/SLE-15-SP3-Full-x86_64187.11.001
1. lvextend -L +20G /dev/mapper/system-root
2. btrfs filesystem resize +20G /
Result:
SAPHANA:~ # btrfs filesystem resize +20G /
Resize '/' of '+20G'
SAPHANA:~ # df -h
Filesystem Size Used Avail Use% Mounted on
devtmpfs 4.0M 0 4.0M 0% /dev
tmpfs 6.2G 0 6.2G 0% /dev/shm
tmpfs 1.3G 18M 1.3G 2% /run
tmpfs 4.0M 0 4.0M 0% /sys/fs/cgroup
/dev/mapper/system-root 80G 3.9G 75G 5% /
/dev/mapper/system-root 80G 3.9G 75G 5% /.snapshots
/dev/mapper/system-root 80G 3.9G 75G 5% /boot/grub2/x86_64-efi
/dev/mapper/system-root 80G 3.9G 75G 5% /boot/grub2/i386-pc
/dev/mapper/system-root 80G 3.9G 75G 5% /srv
/dev/mapper/system-root 80G 3.9G 75G 5% /home
/dev/mapper/system-root 80G 3.9G 75G 5% /opt
/dev/mapper/system-root 80G 3.9G 75G 5% /tmp
/dev/mapper/system-root 80G 3.9G 75G 5% /var
/dev/mapper/system-root 80G 3.9G 75G 5% /root
/dev/mapper/system-root 80G 3.9G 75G 5% /usr/local
tmpfs 637M 60K 637M 1% /run/user/466
tmpfs 637M 56K 637M 1% /run/user/0
/dev/sr0 12G 12G 0 100% /run/media/root/SLE-15-SP3-Full-x86_64187.11.001
Sunday, 26 November 2023
How To Backup Windows Server 2016
How To Backup Windows Server 2016
Here we’ll show you how to install the Windows Server Backup feature in Windows Server 2016 with PowerShell and then configure basic server backups.
We’ll also take a quick look at how the backup files are stored and see if they are at all encrypted or not.
In order to perform simple backup and restores out of the box, Windows Server 2016 provides the Windows Server Backup feature. While this does work it is fairly basic and lacks many useful features, if you have many critical servers to backup I highly recommend that you look at something else such as Microsoft’s Data Protection Manager (DPM) or a third party backup solution from some other vendor.
An example of this is that when you backup over the network to an external share with Windows Server Backup you can only store one restore point at a time, any further backups will overwrite existing ones which isn’t very useful if you actually need some sort of retention. The backups are also managed on a per server basis which makes them difficult to maintain and manage.
Install Windows Server Backup Feature
Before we can actually configure the backups, we must first install the Windows Server Backup feature. This can be done through the graphical user interface, however it’s just faster to simply use PowerShell.
First we’ll use the Get-WindowsFeature cmdlet to search for available features that contain the string ‘*Backup*’ in the Name field.
PS C:\> Get-WindowsFeature -Name *Backup*

As we can see Windows-Server-Backup is available for install but not currently installed.
Next we use the Install-WindowsFeature cmdlet to install the Windows-Server-Backup feature, as shown below.
PS C:\> Install-WindowsFeature -Name Windows-Server-Backup

Once complete we should see that the installation has completed successfully, no reboot is required for this feature, we can begin using it straight away.
Configure Backups
Now that we have installed the Windows Server Backup feature, we can begin to configure our server backups. To begin we’re going to open the Windows Server Backup console from the Tools menu in Server Manager as shown below.

From the wbadmin window that opens up, select “Local Backup” from the menu on the left. We will see that there is a warning noting that no backup has been configured for this computer, which is currently expected. We can either configure a backup schedule which will perform the backup as we define, or we can perform a once off backup. Here we’ll setup a backup schedule, by clicking “Backup Schedule” on the right.

This will open up a Getting Started window advising that we can use this wizard to configure a regular backup schedule for the full server, system state, selected files, folders or entire volumes – click Next to proceed.
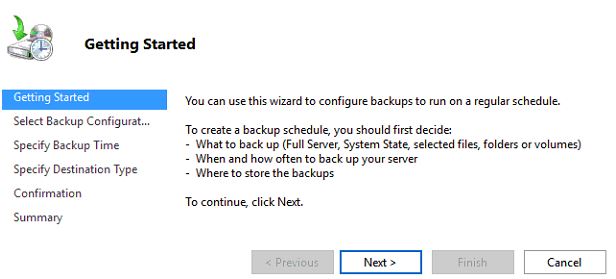
On the next Select Backup Configuration window we can select if we want to perform a full server backup which is the recommended and default action, or we can optionally select custom to pick specific volumes or files that we want to backup rather than the full server. In this example we will be configuring a full server backup, however you can change this to suit your requirements.

The next window allows us to specify the time the backup should run. We can set the backup to run once daily at a specified time, or we can optionally have it run multiple times per day by selecting the more than once a day option and adding the times the backup should run to the right side.

Next we will be asked to specify the destination of our backup data. The recommended option is to store the data on a separate disk that is attached to the server, however we can also change this to backup to another volume, or a network share. In this example I’ll be using a network share as I have one available, however note that there is a limitation of this, we will only be able to store one backup point at a time as new backups will overwrite the existing one. This limitation does not exist when you backup to another disk or volume.
We will now specify the network location, here I pick a file share that is available on the local network and click Next to continue. If you selected a disk or volume destination rather than network, you would instead be asked to pick that disk or volume here.

Finally we are presented with a confirmation screen which will summarize our options, click the Finish button to complete the process and accept this, or otherwise go back and make any changes as needed. The summary notes that as we are performing a full backup, we will be able to perform bare metal recovery of the entire system which is fairly powerful.

That’s it, the backup should automatically start at the time specified. We can manually initiate it by going back to the Windows Server Backup window and selecting “Backup Once”. From here we are given the option to create a once off backup based off of our scheduled backup, so all of the same settings will be used but we will be running the backup now rather than at the scheduled time.
Are Windows Server Backups Encrypted?
This is a common question that I’ve seen asked a few times, so I thought I’d take the opportunity to answer it here. No, by default backups in Windows Server 2016 (and previous versions for that matter) are not encrypted. We can confirm this by simply browsing to the location that we have specified to backup the data to and look through it. Primarily a .vhdx file is created for the C:\ drive of the server, which we can easily mount through disk manager, assign a drive letter to and then browse through the files and folders.
To encrypt the backup files we could setup Bitlocker on the disks where the backups are being stored, however note that this only protects the data at rest. If the data can be accessed while the drive is available for the backup to work, it could also be read by any potential attacker during this time.
Summary
We have shown you how to install the Windows Server Backup feature in Windows Server 2016 using PowerShell, and then configure a basic backup schedule to a network share.
We also then confirmed that the backup files are not encrypted, so additional steps should be taken to protect them.
Monday, 1 November 2021
How to get hardware key of the ABAP system at OS LEVEL
Login with <sid>adm
Cmd:
Saplikey -get
Output:
HARDWARE KEY = **************
Saturday, 12 June 2021
How to make one SAP application dialog instance in to passive mode.
About:
Step1: login to ABAP server through SAP GUI.
This article is all about, how to make one particular SAP application dialog instance in to passive mode.
Case studies of this activity:
- when maintenance activity is going on one particular sap instance.
- during resolving few abap dumps in ST22.
Practical steps:
Step1: login to ABAP server through SAP GUI.
Step2: Access the t-code: SM51.
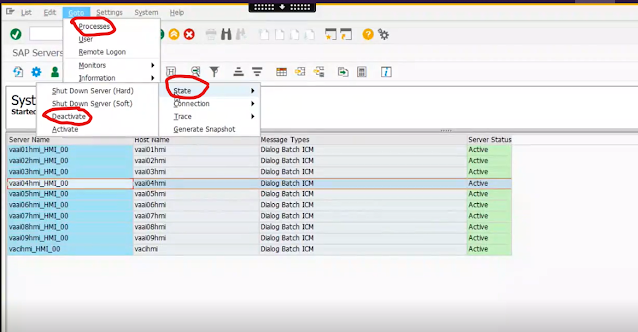
Step3: perform the below navigation to make one SAP application dialog instance in to passive mode.
Step3: perform the below navigation to make one SAP application dialog instance in to passive mode.
Goto--> Processes -->state-->Deactivate.

Saturday, 6 March 2021
How to check HA replication info
open putty session and execute below sequence of commands:
1. sudo su - <sid>adm
2.hdbcons
3.replication info
check the time stamp in the lines:
replylogpostimestamp : 20.12.2020 - 11.32.15
shippedlogpostTimestamp : 21.12.2020 - 11.32.15
* 32 - seconds.
* 15 - msec
Tuesday, 2 March 2021
How to use dpmon tool - to monitor work process status @OS
Dpmon - Dispatcher monitoring
Dpmon tool is use to check the status of work process or dispatcher queue @ operating system level without login to SAP GUI.
use cases:
1. To get the status of work process @ OS level, when the SAP GUI login is not possible.
Practical steps:
1.login to putty session using <sid>adm user.
2.To list down the available profiles, issue command- cdpro or (/sapmnt/<SID>/profile)
3.follow by command - ls
4.dpmon pf=<use_the_profile_used_for_application_server> - results shows dispatcher queue statistics.
5.type 'm' to display all the menu available for the dpmon.
6.type 'I' to display work process overview.
7.step 4,5,6 can be replace with command - dpmon m i
8.if all the work process are full take the PID of the work process and kill the process id with command- kill -9 <PID>
Friday, 12 February 2021
SQL Ports for HANA 2.0 to connect system database and tenant database
in MDC, hdbuserstore keys need to be set based on the SQL port.
- Keys for Systemdb must be set using SQL port 3<02>13
- Keys for Tenant DB must be set using SQL port 3<02>13@<Tenant_DB>
here <02> is instance number.
Saturday, 21 November 2020
Migrate EULA price list to the new contract
Due to business expansion, end user & SAP users expansion, ERP companies buy new EULA (End User License Agreement) from SAP. The below process need to perform to migrate from present price list of ELUA to new price list.
1.Access the T-code: USMM
2. Navigate to Environment --> Migration of Price list.

3. Select respective user changes from present user type to target user type.
then click on execute.

Saturday, 10 October 2020
introduction to SAP ERP
SAP (System Application Product for Data Processing) is a
leading software products suppling company.
Ø SAP is Developed ERP
Software (Enterprise Resource Planning).
Ø In
1972 Four Ex-Employees of IBM Company have started SAP.
Ø They
have Developed ABAP module which is Combination of “C++, COBAL”.
Ø SAP
Supports 24/7 by 365 Days through “service.sap.com”.
Ø SAP is OS Independent
& also it can Support any OS.
Example: purpose all the below banks is to take deposits from the bank customer with less interests to the deposited money and provide loans with that money with higher interests. and basically they are banks.
HDFC BANK
DBS BANK
similarly all the below leading company motive to built ERP apps and sell to all Enterprise Resource Planning company.
SAP ERP apps
Oracle ERP apps
Concur ERP apps


ERP stands for Enterprise
Resource Planning.
ERP is a suite of software applications that an organization uses to
integrate and manage its business activities such as finance and accounting,
warehouse operations, procurement, project management, risk management and
compliance, supply chain processes, transportation, distribution, quality
control, along with sales and marketing.
A complete ERP system also includes enterprise performance management and
software that assists in planning, budgeting, forecasting, and reporting of
business activities and results.
SAP system
consists of a number of fully integrated modules, covering virtually every
aspect of business management. SAP is #1 in ERP market and one or more of its
modules are implemented by most of the large and medium corporations across the
globe.
Due to its
reach and widespread implementation, SAP technology/applications provide huge
career prospects across organizations. As SAP consultant, you can earn upwards
of $75,000 per annum.
- ERP software is considered to
be a type of enterprise application, that is software designed to
be used by larger businesses and often requires dedicated teams to
customize and analyse the data and to handle upgrades and deployment. In
contrast, Small business ERP applications are
lightweight business management software solutions, often customized for a
specific business industry.
- The central feature of all ERP
systems is a shared database that supports multiple functions used by
different business units. In practice, this means that employees in
different divisions—for example, accounting and sales—can rely on the same
information for their specific needs.
EX: Book à
Database.


Good references:
Friday, 2 October 2020
attach mount point to EBS volume using script
#!/bin/bash
#attach the EBS drive from the console to /dev/sdf
#list the volumes
lslbk
#check if the volume has any data
sudo file -s /dev/xvdf
#format the volume as ext4
sudo mkfs -t ext4 /dev/xvdf
#create a directory
sudo mkdir /myexternalvolume
#mount our EBS to our directory
sudo mount /dev/xvdf /myexternalvolume
output for the above script:

# with the above process the mount point will save temporarily, To save new mount point changes permanently. edit fstab file.
sudo nano /etc/fstab
manually activity:
/dev/xvdf /myexternalvolume ext4 defaults,nofail 0 0
press ESC
:wq!
cat /etc/fstab --> check our new entry.
Attach new EBS volume to EC2 instance
This post will help you to attach a newly crated EBS to volume to particular EC2 instance.
Note: EBS volumes can attach to EC2 only, if both EC2 and newly created EBS volumes are in same Availability Zone(AZ).
Here are the practical steps:
From the EC2 console page --> Navigate to Elastic Block Storage --> volumes.
select the newly created EBS volume --> Right click on it --> choose with Attach volume option(as shown below).

Provide instance id (which will obtain in EC2 launch page, instance id id EC2 instance specific).
Device : /dev/sdf or /dev/sdp, based on previously available volume.
Click on Attach.

Thursday, 24 September 2020
How to release an elastic ip to avoid unwanted billing in AWS
This will provide you procedure for Disassociate public ip which is already assigned to EC2 instance and Release public IP which is associate to AWS account. To avoid unwanted billing with unwanted public ip.
Practical steps:
- From the Elastic ip page --> Right click on the Elastic IP --> Disassociate address.

- Then the below conformation screen will appears, conform it.

By the above steps, the fixed public ip which is assigned to one EC2 will be removed. As usually for every time when EC2 instance restarts new public ip will be assigned.
By the below releasing address process:
the public ip will be removed from AWS account to avoid unwanted billing, if the public ip is not longer use.

conform it in the conformation screen.


Wednesday, 23 September 2020
Assigning fixed elastic(public) IP to EC2 instance.
Usually when you stop and then start an EC2 instance, it can changes its public IP.
if you need to have a fixed public IP for your instance, you need an Elastic IP. An Elastic IP is a public IPv4 IP you own as long as you don't delete it.
Practical steps:
From the EC2 instance launch page, Navigate to Network & Security --> Elastic ips.

Click on Allocate new address now.

Click on Allocate.

Then the below pop up screen comes up with public IP. Click on Close.

Then from the Elastic IP page, Select the IP address with check box(1 as highlighted below) --> Actions drop down --> Associate Address.

Provide details:
Resource type: instance
Instance : Instance ID
Enter private IP details
Instance : Instance ID
Enter private IP details


Monday, 21 September 2020
How to make changes in assigning security groups for an existing security groups in EC2
From the EC2 instance launching page --> right click on the instance --> Networking -->Change Security Groups.

Assign or un assign security groups by checkbox &Click on Assign Security Groups.

Sunday, 6 September 2020
Modifications to existing Auto scaling Group
-----------------------------------------------------------------------------------------------------------------------------------------
This post will answer following questions:
How to make changes to existing Auto Scaling Groups in AWS.
How to changes no. of EC2 instance value for scale out and scale in Auto Scaling Group.
-------------------------------------------------------------------------------------------------------------------------------------------
From the EC2 instance launch page, Navigate to Auto scaling --> Auto scaling Groups(as highlighted below).

Click on edit, Now to change the EC2 instance value.

Make all the required changes. Here in my case i am changing Min from 2 to 1 and max from 2 to 6 EC2 instances.

Finally save the changes.

Subscribe to:
Posts (Atom)