Saturday 28 November 2020

Killing long running unresponsive dialog work process

 Killing long running unresponsive dialog work process


  • Access the T-code: SM50
  • Select the long running unresponsive dialog work process.

  • Perform the below navigation.

  •  Click on Yes.


Manually switching of operation modes

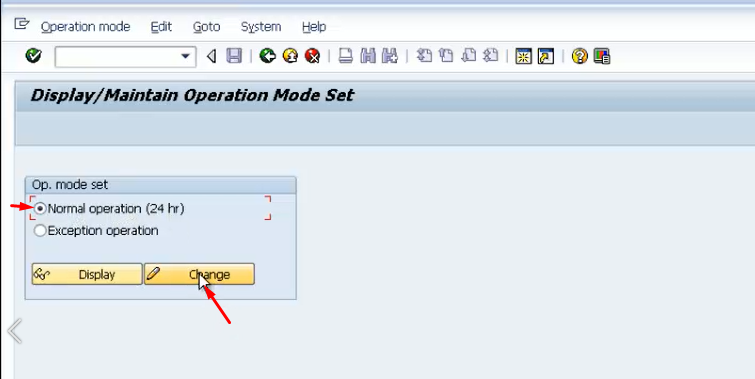
 To know more about operation modes: Click here

During year end activity.

During Weekend.

or when ever their is not user traffic and perform the below process. To switch operation modes manually.


  • Run the T-code: RZ03.
  • Navigate to Control --> Switch operation mode --> All servers.                                                         


Operation modes configuration

Intro:

The demand of accessing the SAP system may varies from DAY time to Night time may varies for their own day to day activities.

in DAY time more user will login in to server through Dialog wp.

in Night time more Background work process are required to perform more Background jobs.

* Operation modes will make the SAP instance, effective utilization of hardware resources.


  •  Access T code: RZ04


  • Step 1/3: Creating operation modes:                                                                                                      
  • the RZ04 screen looks likes the below. Click on Create button.                                                                 


  • enter the operation mode name, description and name.                                                                                        


  • Day operation mode created successfully and click on create button again to create night operation mode.


  • Enter details for the night operation mode and save.
Results with 2 operation modes created.


Step 2/3: Assign no. of work process for the operation modes.                                                                        
To define no. of dialog and background work process for operation modes. Need to click on Instances/Operation modes.


Resultant screen looks like below.


To load present work process data in to operation mode. Perform the below navigation and click on Generate.


Work processor information is loaded now in to operation modes. But both operation modes are available with same no. of dialog,back ground,spool,up1,up2,enq.


To re distribute the work process in day and night mode. just double click on the night operation mode.
Here as per my requirement, i am changing no. of dialog wp to 5 and background wp 8.


Save and check for the conformation message.                                                                                                     


Step 3/3: Set up Time for the operation modes based on client business hours.                                         

For that go back to the previous screen.                                                                                                                


Navigate to Operation mode --> Time table.


select the normal operation(24hr) and change.


Double click on 8:00 and 20:00 and choose with Assign option.


select operation mode and continue.


Similarly assign remaining timing to Night operation mode.


click on SAVE.


when the Night operation mode time comes the wp count will changes automatically.

can check that in t-code: SM50.


----------------------------------------------------------XXX------------------------------------------------------------


Friday 27 November 2020

rdisp/tm_max_no


Parameter

rdisp/tm_max_no

Short text

Maximum number of possible logons

Parameter Description

This parameter restricts the maximum number of logons per instance. This includes SAP GUI logons, RFC and HTTP logons, and also logons for internal tasks (for example, the execution of background jobs or updates).

Application Area

Dispatcher

Default Value

200

Who is permitted to make changes?

Customer

Operating System Restrictions

None

Database System Restrictions

None

Are other parameters affected or dependent?

None

Values allowed

Whole Number >= 10000

Tuesday 24 November 2020

Remote client copy

 Pre-requsites:

  • Create client in the target system using SCC4.
  • Set login/automatic login sap* profile parameter and restart the server.
  • ABAP RFC connection from target to source client using SM59.
  • system user in source client.
  • All connection test should work in SM59 from target to source.
Process:

login to target client.
Run T-code: SCC9
provide profile and RFC connection details to source client.

click on Schedule as Background job.


 enable immediately check box --> schedule job


Review and click on continue


click on continue


Now Access T-code: SCC3


Based on the data in the table,it will take some time to complete the remote client copy.can check the successfully completed status as highlighted below.


Client export and import

 Pre- requisites for client export and import:

  • Check the size of client using report rsspacecheck.
  • Login credentials for both source and target client and their authorization.
  • Source SAP system and Target SAP system should be same version inclusing TP tool and R3 trans.
  • Check for TMS configuration.
  • There must not be any background job running or in released status in the SAP system (SM37).

Process:

source system:

  • Run the T-code: SCC8
  • select the correct profile and description
  • select the target system details(Namesake)
  • schedule as background job
  • conform the pop up based on profile selected.
  • check the SCC3 logs.

TR files will be generated in /user/sap/trans/cofiles
                                      /user/sap/trans/data      

move the above data,cofile & text file to respective location in the target system @ OS level.

target system:

Run t-code: stms_import
Navigate to  Extras > Other Requests > Add, ---> enter the TR number.
import the TR.
Run scc7
check logs in scc3

Monday 23 November 2020

Lock Client of SAP system

 1. SCCR_LOCK_CLIENT (to lock the client)

2. SCCR_UNLOCK_CLIENT (to unlock the client)

This function is used to lock \ unlock client from logins. When you lock a client, all users try to log on A client will show message “A client currently blocked from entering.” A client will be available for entry only available to users SAP * and DDIC.

To lock:

1. Run t-code : SE37
2. Enter the name of the module SCCR_LOCK_CLIENT
3. Press F8 to activate

4. Enter the number of client and press (F8).


To unlock:

1. Run t-code : SE37
2. Enter the name of the module SCCR_UNLOCK_CLIENT
3. Press F8 to activate
4. Enter the number of client and press (F8).


My reference:

Client Creation inputs screen


The client creation screen and inputs need to provide to create client in sap. i hope the below screen shots will help you in the interview process when you don't have any system access.


Sunday 22 November 2020

step by step process for SAP User audit(EULA)

1.Based on the SAP contract, each customer is obligated to perform system measurement of a systems.
2.measuring the system determines No. of SAP systems are in use and No. of user of SAP systems.
3.Before system measurement takes place SAP sent. so called measurement request to the customer. with some details how to perform such a measurement.

with the measurement request following attachments are available:
  1. measure plan: information about all installation and systems.
  2. special version of measurement plan: need to upload to measurement tool SLAW.
  3. self declaration plan: To add new product for the measurement plan.
  4. snote list. - provides the list of snote that need to implement before system measurement.
To perform system measurement need 2 t-codes:
  1. USMM : system measure for single system.
  2. SLAW ; consolidation all systems measurement.
start system measurement: need to perform on each system in the measurement plan.

1. enter the T-code: USMM.


select the type of the system. in case any client in the system of type production. select the checkbox for production.


in client tab:

Enable all the production clients in the production server.
Enable all the development clients in the dev server. similarly for QAS server also.
remaining clients can be uncheck for the system measurement.


in the price list tab: need to select the price list according to your SAP software contract.

in the system measurement request email. the info about the price list is available.


 Depending on the selected price list chosen, the system shows related default use which is used to classify the unclassified users.


User types: the user list available in the list here. can be used for user classification.
SAP recommends to uncheck the active check box for the user types which are not required.


To specify the customer specific user type can defined here by replacing the special module type with best description and can user in defining user type in su01 --> LIC data tab.


Address tab: if need to get conformation once audit data sent to SAP. Need to maintain sender and receipt mail id here.


All the information provided in the 5 tabs should be correct and accurate. to avoid cross questions from SAP.

User classification:

Please note that you can classify and reclassify user with in the logon client users.


Need to switch to valid users list.

with valid users option, users with validity will only will be listed.


select all unclassified or user which need to classify and go with the option classify selected Records:


Select the correct and required user type from the drop down and click on save.                        

select the user type in the drop down and SAVE.                                                                                      
Mass change option in USMM tcode.                                                                                                                


here we have 2 option,                                                                                                                
1. to classify all non classified user at once.                                                                 
2.Change user type from one type to another.                                                                  


to classify non classified user, follow the below process.                                                                              
1. Select the user type for the unclassified users.
2.Click on execute.                                              


To change already defined user type in to another perform the below navigation.                                            


System measurement logs: logs provide all relevant information by last system measurement.

To display the measurement results. Click on the logs.


the measurement logs are structured in different sections:
  • sender and recipients information provided in the address tab.
  • system data includes installation number and system type info.
  • Status of background job should be finished for all the entries.


Troubleshoot logs:

in case of any wrong assignments 


After pressing the logs option --> the below pop up will be shown in the screen with the inconsistency list.

here i am selecting professional users w. Inconsistent  Classification.
then followed by workbench users with inconsistent classification.


The system determines and display users that are made entries in certain database tables during 4 weeks period from the system measurement and which activity do not match the currently selected user classification. This user should be classified as either professional or limited professional.

To check what is the activity performed by the user to make him as professional or limited professional user --> Click on the Activity box as highlighted below --> change --> make the user changes --> save.


if you use license agreement tool to consolidate the result, download measurement results per system.
In the menu bar go to system measurement --> Export to LAW file.


alternative download for Email and sent result through email.


Consolidation: which consolidates measurement results to avoid multiple counting of same user.

Now we can go for Prod login as we are sending through the SAP Central Instance Installation production system.


  •  Run T-code SLAW:
  • Here we can upload the template(.xml file) given by SAP & upload all the req systems License report or here in you may just leave as it is if no new SAP system launched since last year & just make a reply mail by saying that other systems we are not using. If want to upload the .xml file then, as below Change view-> Maintain RFC Data


Then save the .xml file sent from SAPLabs to your desktop & as follows click on the open button to browse to the .xml template & click open & it will show what & all the systems are required to be measured as per SAPLabs & whatever systems License data you will not be sending to SAPLabs , you can just select the column & press the delete button as follows,
in case the system is not in use from last system measurement to now.
in case any new system added from the last system measurement. choose add button as shown below (4).


once after adding all the system data start consolidation and sent the final result to SAP.