Friday 31 July 2020

How to configure email alert in AWS for EC2 instance, if CPU load is above 90%


If cpu utilisation is above 90%. then the below configuration will trigger an email notification conveying the same.


Practical steps:                                                                                                                                                       

1. Login to AWS console.                                                                                                                 
2.Ensure that your in correct require DC.                                                                                         
3.Navigate to Services --> under Management & Governance -->Cloudwatch as shown below.


4. Then the below display will display.                                                                                                 


5.Click on Alarms now.                                                                                                                                


6. Click on Create Alarm as shown below.                                                                                                              

7.Now click on select metric as shown below.                                                                                       


8.Click on EC2 as shown below.                                                                                                                   


9. Click on Per-instance Metrices.                                                                                                                   

10. In the new browser tab collect the EC2 instance id info from  running instance page(Services -->EC2-->Running instance -->collect the instance id number for correct EC2 instance for which CPU mail alert is required.

11. Based on the instance id number from the above step & CPU utilization from Metric Name column, select the correct entry, by select the check box as shown below.

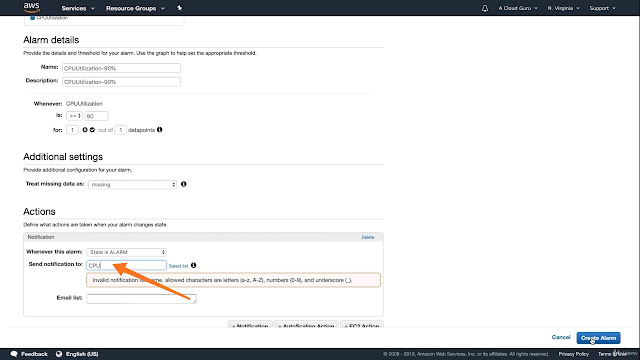
12.Enter Alarm details:                                                                                                                                     Name & Description are free text, generally used for better identification among other alarms.   
is >= 90      is the actually value that will trigger the mail. 
1 minute out of 1minute, if the CPU utilization is above 90% for 1 minute out of 1 minute then mail will trigger.

eg: can use 5 minutes out of 3 minutes.
                  10 minutes out of 5 minutes.


13.Enter the recipient mail id by clicking on the New list option as shown below.                                                                       


14.Enter the Alarm description again here in the below highlighted field & click on create                       alarm option available at the right side bottom of the screen.                                                          


15.Then screen prompt for the mail confirmation screen. Open receipt mail id, inbox and conform the acknowledge the AWS alerts.


16.By click on the conformation link in the mail. screen similar like below will appears.                                   

17. Click on View Alert now.                                                                                                                        

18. Optional steps: To check the functionality of Alert. open the putty session for the EC2 instance and execute the lines while true; do echo; done;
so that CPU utilization reached to 90% with in short time.

To open the putty session for EC2 instance:                                                                                                  how to establish putty connection to AWS EC2 instance using AWS console      


19. Hurrah!!! It working.                                                                                                                                        


Wednesday 29 July 2020

How to enable Cloud Watch detail monitoring for EC2 instance

what is cloud watch service?

Amazon Cloud watch is a monitoring service to monitor your AWS resources, as well as the applications that you run on AWS.

Cloud watch can monitor things like
  • Compute
  • EC2 instances
  • Auto scaling Groups
  • Elastic Load Balancers
  • Route53 Health Checks
  • EBS Volumes
  • Storage Gateways
  • Cloud Front 
More over cloudwatch monitor the performance.

Host Level Metrics consist of:


  • CPU 
  • Network
  • Disk
  • Status Check


What is AWS Cloud Trail?

AWS CloudTrail increases visibility into your user and resource activity by recording AWS management console actions and API calls. You can identify which users and account called AWS, the source IP address from which the calls were made, and when the calls occurred.

CloudTrail monitors API calls in the AWS platform.


Note:


  • Cloudwatch is used for monitoring performance.
  • Cloudwatch can monitor most of AWS as well as your applications that run on AWS.
  • Cloudwatch with EC2 will monitor events every 5 minutes by default.Can have 1 minute intervals by turning on detailed monitoring.
  • You can create cloudwatch alarms which trigger notifications.
  • Cloudwatch is all about performance. CloudTrail is all about auditing.

Practical steps:

Note: By following the below process, all the monitoring information will be collected from the system for every 1 min.

1. login to AWS console.
2.Navigate to Compute -->EC2--> Launch instance
3.Select the required AMI.
4.Choose instance type.
5. To enable detail monitoring for every one minute, check the checkbox as shown below.


6.Add storage in the next phase.
7.Add Tags.
8.Configure Security groups.
9.Finally Review and launch instance.
10.Once after completing the launch.in the monitor tab detail analysis is available.


Tuesday 28 July 2020

Performance enhancement with EC2 Hibernate

What is EC2 HIBERNATE?


Use cases of EC2 HIBERNATE:


How to enable Hibernate in AWS EC2?

While launch EC2 instance in configure instance details phase.


Need to enable the check box for hibernate.as highlighted below.


To use the advantage of EC2 HIBERNATE, root volume must be encrypted in the Add storage phase.


Provide the additional storage volume for the root volume. The value depends on the information stored in RAM before stop.As in hiberate mode all the present state  information moved to root volume after stop and copy the previous state info of system from root volume to RAM again when the system is started.

Here I'm increase my root volume storage from 8 GB to 25GB.


Finally which stoping with hiberate mode. Select stop-Hibernate option.


To check the configuration of EC2 HIBERNATE. Use command uptime. It should show value, before the stop hiberate,stop time.


Instance cannot be on Hibernate more then 60 days


Monday 27 July 2020

HanaHwCheck.py

HanaHwCheck.py

Check and list complete HW information of the related system.

python HanaHwCheck.py –v


Spot instances and Spot Fleets

Amazon EC2 Spot instances: let you take advantage of unused EC2 capacity in the AWS cloud. Spot instances are available at up to a 90% discount compared to On- Demand prices. You can use Spot instances for various stateless, fault-tolerant, or flexible applications, such as big data, containerized workloads, CI/CD, web servers, high -performance computing (HPC), and other test and development workloads.

Usually Spot Instances will be used to systems where continuation  system is not required. termination notification of system will be notified with in 2 mins of time only.

Spot Blocks: To stop your spot instances from being terminated even if the spot price goes over your max spot price. You can set spot blocks for between one to six hours currently.


Spot Fleets:

Spot Fleets will try and match the target capacity with your price restraints.

AWS Certification tips:

How to encrypt root device volumes?

root device volumes are basic an EBS volumes, where Operating system is installed.
Converting EBS volumes from not encrypted to encrypted:
  •  provision an EC2 instance.
  • take snapshot for the root volume.
  •  copy the snapshot, while coping make it as encrypt.
  • Provision a AMI with the encrypted snapshot copy.
  • Launch EC2 instance with the above encrypted AMI image.

Sunday 26 July 2020

Instance store (ephemeral storage)


With instance store volumes, only reboot and terminate option will work. the operations like stop,start will not work here.
Because if any hyperscaler got issue and not able to start, all your data will loss.

Friday 24 July 2020

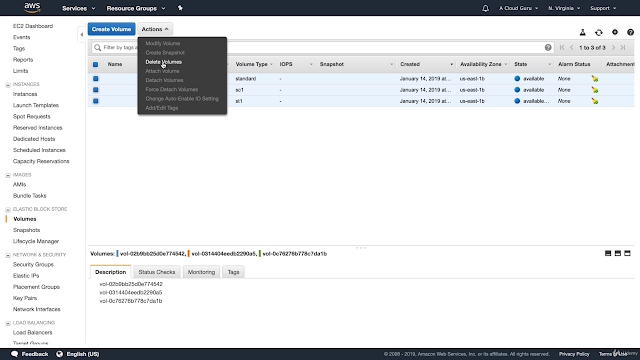
Deleting EBS volume manually.

  1. login to AWS console.
  2. Navigate to Services --> compute --> EC2 --> Volumes.
  3. Select the unwanted volumes, From the Actions drop down --> Delete Volume.

--------------------------------------------------------------------------------------------------------------------------
Note: 

By default, if any EC2 instance is terminated only root volumes are deleted for that particular EC2 instance. it depends on the settings made at the time of EC2 instance launch.

To delete the unwanted volumes need to follow above procedure.


Wednesday 22 July 2020

how to take snapshot for the EBS Volumes


Intro:


  • Practical steps:
  1. Login to AWS console.
  2. Navigate to Services --> Compute --> EC2 --> Running instances--> select the EC2 instance.
  3. Navigate to Volumes.

4. Select the check box for the volume and Navigate to Actions menu --> Create snapshot. For which snapshot is required. here i am considering root volumes.


5. Then the below screen will appears,Provide description & click on Crete snapshot.                                                                          

6.Conformation screen.Click on close.                                                                                                      
                                                                                         

7. Then from Volumes page. Navigate to snapshots screen.                                                                          


8. Snapshot created,can check the complete status here.                                                                               


Tuesday 21 July 2020

Linux command to add mount point to device

To add new mount point to device /dev/xvdf

$sudo mount /dev/xvdf /mnt/new_folder

To unmount a exist mount point

$sudo unmount /mnt/new_folder


How to change the EBS disk type

This post will answer the below question:

1.How to change the EBS disk type.


Practical steps:


Step1: 
          login aws console.

Step 2:
            Navigate to services -->compute -->EC2-->Running EC2 instance -->select the correct EC2 instance.  where the modification of EC2 instance is required.

Step 3:

 Under Elastic Block Store  --> click on volumes.
     Here in the availability zone column, each EBS disk can be found here.
              in the Volume Type column -->EBS type info is available.
To change the EBS drive type of one particular EBS drive to another type -->select the correct EBS drive -->Actions dropdown --> Modify volume(as highlighted below).


Note:
Here in the snapshot column, the snapshot value of represents the root drive.


Step4:                                                                                                                                                              
                                                                                                                                                   
Result for the Step 3 will be as below screen. Here in Volume type drop down select the target type of EBS drive. 
in this scenario, im changing from General purpose SSD(gc2)  type to provisioned iops SSD(io1). 


Step 5:                                                                                                                                                            
                                                                                                                                                           
Selected Provisioned IOPS SSD(io1) as my target type. Along with Volume type, we can change SIZE and IOPS range also in the same screen.


Step 6:                                                                                                                                                     

if any action required at OS level. the list of steps for the activity is available in the links highlighted below. Here the links are available for both Windows and Linux based systems.

Click on Yes. To proceed to next step.


Step 7:                                                                                                                                                      
Conform screen. Just click on Close here.                                                                      

---------------------------------------------------------------------------------------------------------------------------


Before performing the above activity, the Volume type is gc2.

Now it is io1. Hurrah!!! we have succeeded in change the EBS type.                                                         


How to extend the EBS volume size of EC2 instance.

This post will answer the below question:

1.How to extended the EBS volume size of EC2 instance.

Thumb rule:
  • Whatever the availability zone the EC2 instance is running, in the same region the EBS volumes are available. the reason behind this rule is hard disk also should be near to mother board.
  •  if in case the EC2 instance and EBS volume are in 2 different availability zones then manually need to make that available in single availability zone.
Advantage with EBS:
  • can increase the EBS volume size and type on fly. No need to stop or shutdown the system.
Practical steps:

1. login aws console.
2.Navigate to services -->compute -->EC2-->Running EC2 instance -->select the correct EC2 instance.  where the modification of EC2 instance is required.
3. Under Elastic Block Store  --> click on volumes.
     Here in the availability zone column, each EBS disk can be found here.
              in the Volume Type column -->EBS type info is available.

   To extended the size of one particular EBS drive -->select the correct EBS drive -->Actions dropdown --> Modify volume.


4. Here in the below highlighted field the default size of EBS drive is 500GiB and can change the size here. just by enter the required size here in the highlighted field.

5.with in short time the additional storage will add in to the EC2 instance. & To adopt this additional storage few steps need to perform at OS level. This detail steps will be available in the below highlighted links(window or Linux) and finally click on YES to conform adding additional storage.


6.Then the below conform & succeeded screen will appears as shown below.                                           


7. if you click on refresh button as shown below the additional storage will update (services -->compute-->EC2 --> Running instance -->select the correct EC2 instance )

Now in the 3rd EBS disk size increase to 1000GB,can observe in the screenshot below