Showing posts with label AND. Show all posts

Sunday, 21 September 2025

Active and configure audit in SAP HANA

 Auditing: To Track the record of changes in roles of SAP HANA database.


why do we need to setup auditing:

1. Accountability - User are responsibile for the actions they do.

2.Discourage unauthorized access.

3.Monitoring any suspicious activities.

4.To find the source of breach.


To configure Audits in SAP HANA:

* Need AUDIT ADMIN - system privilege is required.


1. Select the target system, where we need to configure Aduit policy --> 1.expand -->2.Security --> 3.Security as highlighted below.


2.Choose the Auditing table as shown below.                                                                                                       


Result of audit logs can be seen by queries in SYS.Audit


Monday, 30 June 2025

External SAP HANA PSE File and Certificate Management

External SAP HANA PSE File and Certificate Management

Certificates can also be stored and managed within files located in the file system of the SAP HANA instance. 


By default, they’re stored in the following path:

/hana/shared/<SID>/HDB<instance number>/<host name>/sec


you’ll find several files with a .pse extension. For example:

sapsrv.pse

saplogon.pse

sapslcs.pse

sapsys.pse

sap_system_pki_instance.pse

sap_system_pki_internal.pse

sapsrv_internal.*.pse


Each file has an intended purpose,
1.authentication 
2.TLS secure communication.


There are two main ways to configure PSE files:

1. Command-line using SAPGENPSE tool


2. Web-based SAP Web Dispatcher Administration GUI

*using SAP web dispatcher tool, we can manage .pse certificates effectively.


To access the Web Dispatcher Admin GUI, the user must have the role:
sap.hana.xs.wdisp.admin::WebDispatcherAdmin

Access URL example:

http://<SAP_HANA_XS_HOST>:80(<instance #>)/sap/hana/xs/wdisp/admin/

Example:

http://w4-dh-hana19e-corp.root.internal.com:8000/sap/hana/xs/wdisp/admin

Authentication is required with SAP HANA internal user credentials.

the landing page will default to the SAP web dispatcher monitor.on the leftside,MENU -->PSE management-->just under the SSL and trust configuration.

The interface has a Manage PSE dropdown where you select the PSE file to manage.

With a PSE selected, the following actions are available:

Interface Option | Description

Recreate PSE
When selected, the active PSE file will be reset to a default state. All certificates will also be removed from the trust store.

Delete PSE
To delete a PSE from the file system, select the PSE file in the Manage PSE dropdown menu, then select this option.

Create New PSE
Used to create a new PSE. When clicked, a new window will appear, allowing you to define the PSE encryption algorithm, key length, distinguished name, and file name.

Export Own Certificate
When selected, a new window will appear containing the certificate of the selected PSE file.

Create CA Request
When selected, a new window will appear containing the certificate request text. Copy this text to a certificate authority to generate a new certificate response.

Import CA Response
When selected, a new window will appear containing a text entry block in which the certificate response text can be pasted or entered.

Import Certificate
When selected, a new window will appear containing a text entry block in which a trusted certificate’s text can be pasted or entered.


Wednesday, 14 September 2022

Calculated column with 2 projections and 1 join

 syntax: "companyName"+'-'+"Legal"

Steps:

1. Right click on the SRC folder -->New --> Folder--> Provide folder name --> Ok.

2.Right Click on newly created folder by the above step -->New --> Calculation view.

3. Provide name for the calculation view --> 

     Namespace - Description.

     Data category - Dimension.

     Type - Standard

Finally Click on Create

4. Create 2 projections

   insert tables in to the projections.

5. Add join node.
feed the join node with 2 projections( by drag and dropping the projections to the join).


6. Double click on the join now.


create the connection between 2 foreign 


 7. in the properties section.
   

    swap the table to right and left, if needed.

   provide the cardinality info
  join type: Left outer, right outer & Full outer.


8.in projection (flow chat)

   again select the columns in the Mapping tab.

9.Next to Mapping tab --> calculated columns tab --> click on + symbol --> 

   Provide : name, 

in the expression edition --> add expression 

"companyName"+'-'+"Legal"


10. double click on Semantics  (in the flow chart).

select the foreign key, between the tables.

11. Save all.

12. Right click on the folder below SRC -->Build.


Friday, 12 February 2021

SQL Ports for HANA 2.0 to connect system database and tenant database

 in MDC, hdbuserstore keys need to be set based on the SQL port.


  • Keys for Systemdb must be set using SQL port 3<02>13
  • Keys for Tenant DB must be set using SQL port 3<02>13@<Tenant_DB>


here <02> is instance number.

Saturday, 5 December 2020

What is the major difference between single-container mode and multi-container mode?

 What is the major difference between single-container mode and multi-container mode?

An MDC system consists of a system database for overall system administration tasks and one or more tenant databases. Tenant databases are completely isolated in terms of persistence, database catalog, users, traces, etc.

Tuesday, 1 December 2020

Determine Ports for SAP HANA Cockpit and Cockpit Manager

 The ports for SAP HANA cockpit and the cockpit manager can be determined in the XS console after the cockpit installation.

Prerequisites

  • You are logged in as <sid>adm user.
  • You know the XS organization manager user password. The password matches the master password, which is set during installation.

Context

Ports, through which the SAP HANA cockpit and the cockpit manager can be accessed, are assigned automatically by the installer. Once the cockpit installation is successfully completed, information about host and ports is displayed. If this information is no longer available, you can execute the following commands in the XS console to determine ports.

You can also assign free ports to SAP HANA cockpit during installation. For more information, see SAP Note 2389709 in Related Information.

Procedure

  1. Change to the directory that contains the XS Advanced installation:
    cd <sapmnt>/<SID>/xs/bin
    By default, <sapmnt> is /hana/shared.
  2. Log on to the SAP HANA XS advanced runtime. To do this, use the following command:
    ./xs-admin-login
  3. Enter the XS organization manager user password.
  4. Display a list of the applications running in the current space. In the command shell, run the following command:
    xs apps

    A list of all running apps is displayed. Information on host and ports are displayed in the urls column. The SAP HANA cockpit is listed as cockpit-web-app. The cockpit manager is listed as cockpit-admin-web-app.

Unenforced and enforced license key in SAP HANA

 * Temporary licenses - 90 days validity.
* Permanent licenses expires - 28 days temp license will be installed.
*Check the validity of HANA license is one of the maintaninece activity.


Saturday, 24 October 2020

SAP HANA Hardware and Cloud Measurement Tools for scale out systems


SAP HANA hardware and cloud measurement tools help customers and partners to optimize their hardware or cloud systems before deploying SAP HANA.

The measurement results are saved into a single file, which can be uploaded to the SAP HANA hardware and cloud measurement analysis for further analysis and reporting. 


prerequsites:

1. Download the SAP HANA hardware and cloud measurement tool from the SAP Support Portal at https:// launchpad.support.sap.com/#/softwarecenter INSTALLATION & UPGRADES Access downloads Search for: hana optim . 

The download package is displayed: HANA HW CLOUD OPTIM TOOLS 2.0. 

The following versions are available: 

○ LINUX ON POWER LE 64BIT 

○ LINUX ON X86_64 64BIT 

2. Select the version according to your requirements. 

3. Save the download archive in the same directory into which the tool should be installed. 

4. Unpack the archive using SAPCAR. 

5. Install the tool on the system you plan to analyze using hcmtsetup.


How it works:


The SAP HANA hardware and cloud measurement tool performs a series of automated tests, for example network tests, file system consistency tests, system management BIOS tests, and CPU benchmark tests. The duration and repeat rate of the tests depends on the type of execution plan that you intend to run. The following execution plans are available: 

● executionplan.json - Default execution plan that helps you to check if the KPIs for SAP HANA certificDtion are met.

 ● full_executionplan.json - Performs the same tests as the default execution plan, but has a higher test repeat rate and thus a longer test duration. This test is required for SAP HANA certification. 


Measure System Configuration and Performance - Scale-out Systems:

Prerequisites 

● You have installed the latest version of the SAP HANA hardware and cloud measurement tool on the system. 

● You have at least 20 GB of free storage space in the location where SAP HANA data can be placed during the test. 

● When using ROM memory, mounts for all hosts or an alias of the same name must be available.

 ● Ports 50000 and 50001 must be open for communication.  


. For scale-out systems, you start the measurement tool on the master host and specify any worker hosts on which the tests should run as well. The tool reads the execution plan, starts the test locally, and delegates tests marked for scale-out to the worker hosts. The tool waits for the completion of the tests on the worker hosts before starting the next test in the execution plan. All test measurement data and the host manifests are collected in one result file written by the master host instance.


Procedure:

1.To start the measurement tool on the worker hosts in verbose mode, enter hcmt -v -S on each of the hosts. 

2. To start the measurement tool on the master host in verbose mode, enter hcmt -v.

 3. Adjust the following variables that are contained in the execution plans:

-----------------------------------------------------------------------------------------------------------------------------

Variable                                                        user entry

-----------------------------------------------------------------------------------------------------------------------------

Log volume                                                  Specify the location where logs should be written. 

Data Volume                                                 Specify an existing location where SAP HANA data can be 

                                                                       placed.

<NvmBasePath>                                            if persistent memory is available, specify mount paths of this persistent memory separated by commas, if no persistent memory is available, leave empty.


4. Enter hcmt -v -p , using the fully qualified path of the installation directory, for example .../installation/config/executionplan.json. 

This starts a measurement using the selected execution plan. The results of the measurement are saved in the hcmtresult-[timestamp].zip file. You can upload the results to the SAP HANA hardware and cloud measurement analysis for a more detailed analysis. For more information, see Analyzing Measurement Results. 

5. End all hcmt processes after finishing the measurement. This helps to ensure that the ports are closed for communication. In particular, remember to close all remote instances, as these may be vulnerable to threats.


Tuesday, 20 October 2020

Concept of swap-in and swap-out

 During normal operation a Linux system tries to keep all application data in physical memory. Linux uses swap-space to store inactive memory pages, evicted from the systems physical memory, in order to free up physical memory capacity. The operation of evicting memory pages from the physical memory to the swapspace is called "swap-out". The operation of restoring pages from the swap-space into the physical memory is called "swap-in".


My Reference:

https://launchpad.support.sap.com/#/notes/1597355

Saturday, 17 October 2020

Navigation for SAP HANA software and Support Packages and Patches for SAP HANA in market place


  • The SAP HANA database lifecycle manager is used to install either individual or multiple SAP HANA components in combination with the server.
  • The SAP HANA database lifecycle manager offers three user interfaces: - a graphical user interface, a command-line interface and a Web user interface.
  • Before starting the installation of SAP HANA, make sure that you have reviewed the SAP HANA Master Guide.


***Caution***

It is essential to keep a copy of all installation media which may be required, for example, for disaster recovery purposes. Installation media which has been superseded is routinely removed from the Software Center and there is no guarantee that all database revisions will be permanently available.


Installation Media for an SAP HANA SPS

1. Open the SAP Software Downloads.

2. Go to INSTALLATIONS & UPGRADES, if not already chosen.

3. Open > By Alphabetical Index (A-Z).

4. Choose H.

5. Choose SAP HANA PLATFORM EDITION.

6. Go to DOWNLOADS tab, if not already opened.

7. Choose SAP HANA PLATFORM EDITION 2.0.

8. Open DOWNLOADS tab, if not already opened.

9. Choose INSTALLATION.

10. select the required files and Add to download basket.

11.Download the items you need.


Support Packages and Patches for SAP HANA

1. Open the SAP Software Downloads.

2. Choose SUPPORT PACKAGES & PATCHES, if not already chosen.

3. Open > By Alphabetical Index (A-Z).

4. Choose H.

5. Choose SAP HANA PLATFORM EDITION.

6. Choose DOWNLOADS, if not already chosen.

7. Choose SAP HANA PLATFORM EDITION 2.0.

8. Choose DOWNLOADS, if not already chosen.

9. Open the required component and download the items you need.


*Note :The items you have downloaded must be available on the host where the SAP HANA system will be installed or is already installed.


Monday, 22 June 2020

Contentserver installation and configuration

Content Server Installation & Configuration


 Contents

Intellectual Property Disclaimer 3

1        Abstract: 4

2        Technical Prerequisites 5

3        Installation Process 6

4        Testing the Connection to the Content Server 26

5        Creating Content Repositories 27

6        Database Manager GUI Installation. 31

7        Backup 35

8        MaxDB and ODBC upgrade 36

9        How to Install IIS role 40


1      Abstract:

Purpose:


Knowledge Provider is a component of SAP Web Application Server and provides the general infrastructure for storing and administrating documents. SAP Content Server is based on the MAX DB and is available on Windows Server (OS Versions are mentioned in PAM).

Both the MAX DB database, which serves as a Content Server, and the Content Server itself are provided with every SAP system installation. This provides the required technical infrastructure for all document-oriented applications and business scenarios that do not require long-term archiving. Because SAP Content Server is integrated via the HTTP interface, the actual storage medium used is transparent to the SAP applications.


Need:


A content server is an external storage system. It can be accessed via the HTTP Content Server Interface. We can able to move the real data from SAP table to content server repository. The real data type can be anyone on the following format doc,xls,ppt,tiff,gif,jpg,cad etc.


Solution:


By using this functionality, we will get free space in SAP database level.


Benefits:


1.    The database is much better suited than a file system to the administration of large amounts of data. Internally at SAP, the SAP Content Server has been used for several release cycles to administrate all documentation

Database administration tools, which are easy to use, are delivered with it. These can be used to make automatic backups.


    Technical Prerequisites

Hardware:


To install the software components, including MAX DB, you need at least 300 MB of hard disk space. You also need as much hard disk capacity as you specified for the data files and the log files for the each partition.


Main Memory             : At least 512 MB

Processor                    : Possible: 1 CPU Recommended: 2 CPUs

Network Protocol        : TCP/IP

Software:


OS       : Microsoft Windows 2008 Server or Microsoft Windows 2012 Server (with IIS)

Further Information:


The SAP System that you want to link to the SAP Content Server must be at least release 4.6C. The hardware platform and operating system used in the SAP System do not limit the SAP Content Server in any way. The HTTP interface ensures that the SAP System is platform-independent.


Note:

In the IIS 7.0/7.5, all the roles are not selected during the installation by default,

Please make sure all the below roles are included and IIS 7.0/7.5 is installed.


Kindly refer the installation guide to set up the required roles for IIS. We have to install the roles as per the guide before go live of this content server project.


1      Installation Process

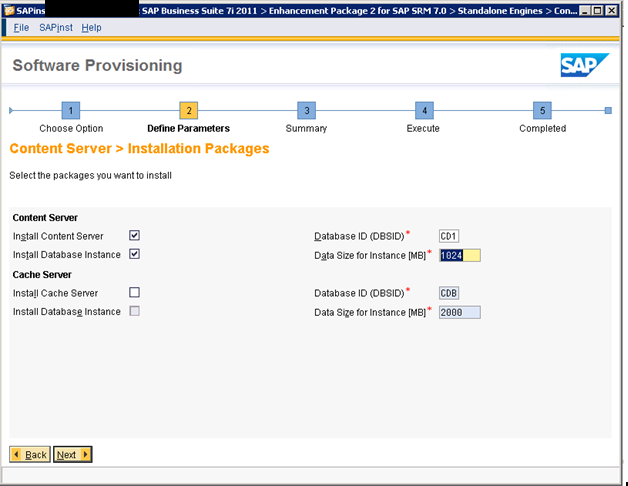
The following sections provide the steps that you have to perform to install SAP Content Server using SWPM.


Kindly check with Wintel Team to install the latest IIS on OS level.


We  have faced some issues during the installation.Kindly follow the SAP note number 1571945 to fix and move forward.


4     Testing the Connection to the Content Server


1. Open a Web browser on a host that is connected to your local network.

2. Navigate to the following URL:


Ex: http://<hostname>:<portno.>/ContentServer/ContentServer.dll?serverInfo


Output:


5   Creating Content Repositories


  1. In transaction OAC0, create at least one content repository for your Content Server.


2.Go to SE38 and run the report RSCMSPWS to set up the OS level password for your content server.


4.Click on CSADMIN tab or use CSADMIN tcode to set few Content server Repository settings


·         Parameter need to be configure as per our content server configuration.


6.  Database Manager GUI Installation


kindly Provide the server details & SUPERDBA or CONTROL password to take the admin mode on our content server database.


·         List of Administration Tasks


7.Backup

Bat file script for backup which need to be schedule every day in task scheduler.


dbmcli -d CD1 -u control,xxxxxxxxx -uUTL -c backup_Start DATA_BKUP Recovery

 In this case, we are keeping last two successful backup to restore if necessary.


·         Delete script:


del X:\CSBACKUP\fullbkp_old1.bkp


·         Rename Script :


RENAME X:\CSBACKUP\fullbkp.bkp fullbkp_old.bkp


·         Rename1 Script :


RENAME X:\CSBACKUP\fullbkp_old.bkp fullbkp_old1.bkp


8   MaxDB and ODBC upgrade

                    Download the MaxDB upgrade guide from service market place.


We have two approaches for this DB upgrade:


7.5 or later           : In-Place upgrade

7.9                        : patch Installation


Here we have MaxDB 7.6, so we are go with in-place upgrade.


  1. Download the MaxDB 7.9 version and call the DBUPDATE.BAT in cmd.
  2. DBUPDATE.BAT –s SAPSID –d CSSID –u SUPERDBA,xxxxxxxxxx


ODBC Upgrade:


9      How to Install IIS role


Go to server ManageràRolesàAdd Role servicesàInstall


References: